Lesson 7 Overview
Upon completion of this lesson, you should be able to:
  • Identify the steps to create a new subapplication using the Application Intake process
  • Identify the information collected in the different sections of Flood Mitigation Assistance (FMA) and Pre-Disaster Mitigation (PDM) subapplications
eGrants Scenario
Businesswoman
Listen to Sally

Audio transcript

Your Role: A new Mitigation Grants Coordinator

Supervisor's Name: Sally Watkins, Hazard Mitigation Grants Supervisor

Agency: Columbia Emergency Management Agency

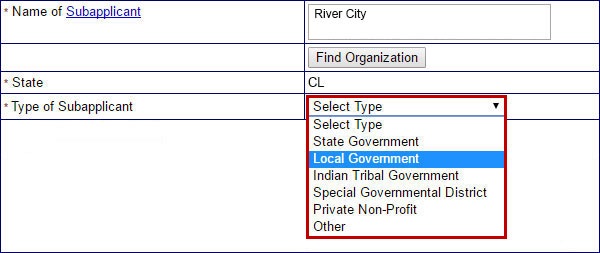
Problem: The Columbia Emergency Management Agency wants to secure federal funding to support flood mitigation programs proposed by communities around the state. A local government has submitted a paper subapplication for a proposed floodplain acquisition project.

To Date: You have created a new subapplication in eGrants using the Application Intake process.

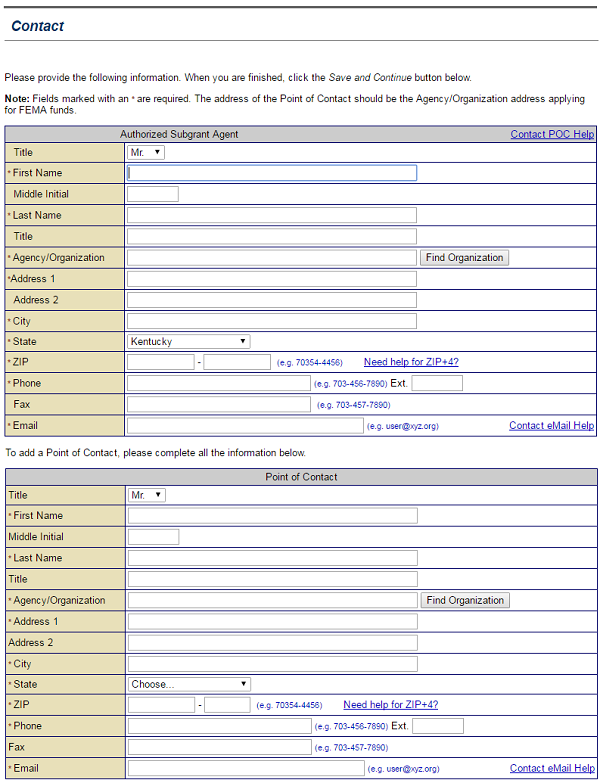
The Next Step: Sally will show you how to enter the data provided on the paper subapplication into the sections of the new subapplication in eGrants.

Hello, this is Sally. Last time we met, you learned how to create a subapplication in eGrants. Now I would like you to begin entering the information from the River City paper subapplication into eGrants. I know that you will have to complete several Applicant acting as Subapplicant subapplications for the state, and entering the paper subapplication will be a good chance for you to learn about each section of the subapplication.
Entering a Paper Subapplication (Application Intake)
Entering a paper subapplication into eGrants is the same as creating a subapplication, except the Applicant user has to certify that a signed copy of the paper subapplication is on file. Subapplication numbers for subapplications submitted in paper form are marked with a red P in the eGrants system.

Sally will demonstrate how to enter a paper subapplication.

Scroll down to see slideshow captions.

Select the Enter Paper Subgrant Application (Application Intake) link from the Grant Applicant Homepage to begin entering a paper subgrant application. See Appendix for alt text description.
Subapplicants sometimes submit paper copies of their subapplications. To enter the data from a paper copy into eGrants, you will look for the Subgrant Applications section on the Grant Applicant Homepage and select the Enter Paper Subgrant Application (Application Intake) link.
Enter the title of the subgrant application, with location and type of activity, on the Enter Paper Subgrant Application screen. The example shows "River City Floodplain Acquisition Project — Phase 1." See Appendix for alt text description.
On the Enter Paper Subgrant Application screen, you need to enter the subapplication title. The subapplication we received is titled, "River City Floodplain Acquisition—Phase 1," so type that name in the Application title text field.
Select either Project Application or Planning Application from the Application Type drop-down menu on the Enter Paper Subgrant Application screen. See Appendix for alt text description.
Select the Application Type drop-down menu. This menu has two options: Planning Application and Project Application. For this subapplication, you need to select "Project Application."
When applicable, enter a Paper Document Control number on the Enter Paper Subgrant Application screen. The example shows: P-05-CL-FY17. See Appendix for alt text description.
Some Applicants have a document control system that assigns each paper subapplication a control number. The Columbia Emergency Management Agency has such a system. In the Paper Application Document Control Number text field, enter the document control number "P-05-CL-FY17" for this subapplication.
Bottom of Enter Paper Subgrant Application screen. To certify your paper application, check the box below. * (checked box) I, Columbia new Hire, acknowledge the creation of paper subgrant application. Save and Continue button (highlighted).
Next, check the electronic signature checkbox to the left of your name to certify that you are processing the paper subapplication. Then, select the Save and Continue button.
To continue entering a paper subgrant application, select either the Start New Application (highlighted) or Copy Existing Application button on the Start New Subgrant Application screen. See Appendix for alt text description.
On the Start New Subgrant Application screen, select the Start New Application button.
The Application Status screen for a paper subgrant application appears. Select a status link, Incomplete or Complete, to open a section of the application. See Appendix for alt text description.
The paper subapplication is created and the Application Status screen appears. For paper subapplications, the Application Status screen displays this message in red type: "This is a paper application."
Subapplication Sections

Each subapplication contains numerous sections. Planning, project, management costs, and technical assistance subapplications contain different section combinations.

The subapplication sections are available through the sidebar menu as shown in the example on the right side of the screen. The sections also appear in the Application Status screen when a new subapplication is created. All sections of a subapplication must have a status of "Complete" before it can be successfully submitted to FEMA in its application.

Preview all the sections of a project subapplication. Select the numbered links on the sidebar menu. Clicking on the image that appears will display a dialog box with important details about that section.

After you become familiar with the information required in each section, Sally will demonstrate how to complete the sections for a Flood Mitigation Assistance (FMA) subapplication using the data from the paper subapplication.

4C7E2052415321FDA23413010006F4EE4C7E2052415321FC925513010006ECC54C7E2052415321FC925813010006ECCA4C7E2052415321FD9DE113010006F4C94C7E2052415321FC925B13010006ECCF4C7E2052415321FC926313010006ECD44C7E2052415321FC926613010006ECD94C7E2052415321FC927013010006ECE4C7E2052415321FC926C13010006ECE34C7E2052415321FC927013010006ECE84C7E2052415321FC927313010006ECED4C7E2052415321FD9CE213010006F49E4C7E2052415321FD9CE713010006F4A34C7E2052415321FD9DD413010006F4BA4C7E2052415321FD9DDB13010006F4BF4C7E2052415321FD9DDE13010006F4C4
The Sidebar Menu lists the application sections and navigation links.
Click on each numbered link on this sidebar menu to access information about the subapplication sections.
Application Status section pop up description
Click on the image for more information.
Screenshot of eGrants Applicaton Status screen.
Application Status
You can use this page to monitor your progress toward completing the subapplication. It is also a quick way move between sections by selecting the status link located beside the section on which you would like to work.
4C7E2052415321FDACA3130100070C9D
Click on the image for more information.
Screenshot of subapplicant section.
Subapplicant Section
This section is used to collect information necessary to identify the Subapplicant organization. If an Applicant is acting as a Subapplicant, then this information is about the Applicant. You can search for the organization using the Find Organization button, and much of the information will be added automatically. If you need an explanation of any of the fields, select the hyperlinks or Help links associated with those fields.
4C7E2052415321FDAC9F130100070C93
Click on the image for more information.
Contact Section
This section is used to collect contact information about personnel within the Subapplicant organization, or the Applicant organization acting as a Subapplicant. You need to provide information for both the authorized agent and a Point of Contact (POC). The Help links provide information to help you complete the section.
4C7E2052415321FDAC9A130100070C8E
Click on the image for more information.
Screenshot of eGrants Community Section. Used to collect information to identify the community where the subgrant funds will be applied. See Appendix for alt text description.
Community section
The Community section is used to collect information about the community that will benefit from the federal subaward. You can search for information on a community by clicking the Find Community button. We will learn more about this section later in this lesson.
4C7E2052415321FDAC96130100070C88
Click on the image for more information.
Screenshot of eGrants Mitigation Plan section. Documents your FEMA-approved hazard mitigation plan. Search for a submitted plan in the FEMA Plans Repository by selecting the Find Plan button. See Appendix for alt text description.
Mitigation Plan Section
This is where you provide information about our FEMA-approved hazard mitigation plan. You can search for a previously submitted mitigation plan in the FEMA Plans Repository by selecting the Find Plan button.
4C7E2052415321FDAC92130100070C83
Click on the image for more information.
Screenshot of eGrants Scope of Work section. Details information about the mitigation activities proposed in your subgrant application. See Appendix for alt text description.
Scope of Work Section

This is where you provide detailed information about the mitigation activity proposed in our subapplication.

There are three parts to the Scope of Work section. Part 1 asks for the name, type of hazard to be mitigated, type(s) of mitigation activity(ies) proposed, and a description of the location of the affected area. For Flood Mitigation Assistance subapplications, it is important to specify “Flood” as the primary type of hazard to be mitigated.

Part 2 asks for latitude and longitude for the project area; an explanation for the need for the activity, who it will benefit, and how the activity will be implemented; and information on the project manager and contractors for the project. In addition, details on the technical feasibility of the project are required.

Part 3 asks for information on how the project will address the identified hazard and any residual risks that will remain after completion of the project. It also asks for information on when the activity will take place, why the activity was selected from other alternative solutions, and information on long-term maintenance that will be provided for the area impacted.

We will learn how to complete Part 1 of the Scope of Work section later in this lesson.

4C7E2052415321FDAC8D130100070C7E
Click on the image for more information.
Screenshot of eGrants Properties section. This is where you add information about the properties that will be affected by your project. See Appendix for alt text description.
Properties Section
This is where you add information about the properties that will be affected by your project. You can manually add property information by selecting the Add Property button.

You can also add multiple properties at one time by selecting the Import Property button and uploading an Excel spreadsheet with the property information. You can download a sample Excel file by using the link within the Import Properties screen. You must add properties for each proposed activity.

You must complete all four pages of the Properties Section to successfully submit your subapplication.

For Flood Mitigation Assistance subapplications, it is necessary to provide the National Flood Insurance Program (NFIP) policy number for each property listed.

4C7E2052415321FDAC88130100070C75
Click on the image for more information.
Screenshot of eGrants Schedule section.
Schedule Section
This section is where you add information about each task necessary to complete the mitigation activity you’re proposing in your subapplication.
4C7E2052415321FDAC83130100070C70
Click on the image for more information.
To complete the Cost Estimate section, select the Add Item button. This opens the Add Item screen with data entry fields for Item name, subgrant budget class, unit quantity, unit of measure, and unit cost. See Appendix for alt text description.
Cost Estimate section
The Cost Estimate section is for identifying the details of budgeted items described in the Scope of Work section. All costs must be based on industry standards. Note that maintenance costs are not included. Select the Add Item button to open a new screen to document estimated costs for elements listed in your proposed Scope of Work. We will learn more about this section later in this lesson.
4C7E2052415321FDAC76130100070C65
Click on the image for more information.
eGrants Cost Share section. Based on Cost Estimate section, Cost Share section to calculate the federal and non-federal share documents funding sources. See Appendix for full text.
Cost Share section
After the Cost Estimate section is complete, you use the Cost Share section to calculate the federal and non-federal share of the estimated costs and to document your funding sources. We will learn more about this section later in this lesson.
Cost Effectiveness section pop up description
Click on the image for more information.
Screenshot eGrants Cost Effectiveness section. This section documents the cost-benefit analysis and the estimated total cost of mitigation projects or plans. See Appendix for alt text description.
Cost Effectiveness section
The Cost Effectiveness section collects information about the cost effectiveness of the proposed mitigation activity. The information to be provided here is based on a FEMA-approved Benefit-Cost Analysis. This section documents your analysis of the expected benefits and the estimated total cost of the proposed mitigation project or mitigation plan. Maintenance costs are included in the Benefit-Cost Analysis, so it is important to use the Total Project Costs figures generated through that analysis when completing this section.

For planning subapplications, none of the fields in this section is required. Therefore, when you first start the subapplication, the status of this section will be identified as “Complete.”
4C7E2052415321FDAC71130100070C60
Click on the image for more information.
Screenshot of Environmental/Historic Preservation Review screen.
Environmental/Historical Preservation Review section
This section gathers information on your proposed mitigation project in terms of 11 different environmental and historic preservation laws and executive orders. Most planning subapplications qualify for a Categorical Exclusion (CATEX). However, project Subapplicants must answer questions in all sections.
4C7E2052415321FDAC6C130100070C57
Click on the image for more information.
eGrants Evaluation section. Pre-Disaster Mitigation Subapplicants must provide details on their projects and planning for the National Ranking and Evaluation process. See Appendix for full text.
Evaluation section
A Subapplicant must complete this section if applying to the Pre-Disaster Mitigation program. Detailed information about the proposed project or mitigation plan must be provided, which will be used by the Applicant to rank subapplications within an application. If a Subapplicant is applying to the FMA program, the “Not Applicable” box can be checked.
4C7E2052415321FDAC66130100070C52
Click on the image for more information.
Screenshot of eGrants Assurances and Certifications section. The Assurances and Certifications section provides documents listing Federal requirements for FEMA grants.  See Appendix for alt text description.
Assurances and Certifications section
This link will only be available if the Assurances and Certifications section is enabled by the Applicant. The Assurances and Certifications section provides documents listing federal requirements for FEMA grants.
4C7E2052415321FDAC59130100070C4C
Click on the image for more information.
Screenshot of eGrants Comments and Attachments section.
Comments and Attachments section
The Comments and Attachments section displays all the comments entered for and documents that have been attached to your subapplication for easy review. You can also use this section to attach additional electronic files or indicate that you are sending supporting document via regular mail. To facilitate the review of the subapplication by the Applicant and FEMA reviewers, it is best to add comments and attachments directly to the section they concern. We will learn more about this section later in this lesson.
4C7E2052415321FDAC54130100070C47
Click on the image for more information.
Screenshot of eGrants Review and Submit Application section. Displays the completion status of subgrant application sections. See Appendix for alt text description.
Review and Submit Subgrant Application section
Using this section, you can review the completion status of each section of your subapplication. All sections must have a status of "Complete" before the subapplication can be successfully submitted to the Applicant. We will learn more about this section later in this lesson.
Subapplicant Section

The Subapplicant section will appear for all subapplication types. A complete Subapplicant section will contain detailed information about the organization submitting the subapplication. The information includes tax number, type of Subapplicant, and non-profit status, if applicable. The fields on the screen that are marked with an asterisk (*) are required, while the remainder are optional.

Sally will help you work on the Subapplicant section of the River City Floodplain Acquisition—Phase 1 subapplication. She will provide you with the appropriate information from the paper subapplication. River City is the Subapplicant.

Scroll down to see slideshow captions.

The Find Organization button on the Subapplicant screen ensures that the Subgrant Applicant name is consistent across all eGrants applications. "River" is entered in the text field on the example.
To help you complete parts of the Subapplicant section, there are features built into eGrants that provide information. The first one is the Find Organization button. We use this to make sure that the name of the Subapplicant is consistent throughout eGrants. You need to enter the first few letters of the Subapplicant's name in the text field. In our case, River City is applying for a subaward. So, type "River" in the Name of Subapplicant text field and select the Find Organization button.
A list of organizations that match your search criteria are displayed on the Search Results screen. See Appendix for alt text description.
The Search Results screen appears and displays a list of organizations. Select the radio button in the Select column next to the name River City. Then, select the Select Organization button. This inserts the name of the Subapplicant and the State field automatically into the Subapplicant section.
This inserts the name of the Subapplicant and the State automatically into the Subapplicant section. Select the Type of Subapplicant drop-down menu to display the types of Subapplicants. This drop-down menu has six options. We need to choose the appropriate Subapplicant type. In our case, we should select the "Local Government" option. At this point, you can scroll down and complete the other fields on this screen.
Contact Section
The Contact section collects information about whom to contact if there are questions about the subapplication. The Contact section requires that contact information for an Authorized Subgrant Agent be provided such as name of the agent, name of the agency, address (i.e., of the agency/organization), phone number, and e-mail address.

A Point of Contact (POC) is not required, but is suggested. Both the POC and the Authorized Subgrant Agent may be notified via e-mail by the Applicant regarding the status of the subapplication once it has been submitted.
Community Section

The Community section collects information about the community that will benefit from the proposed mitigation activity.

Subapplicants should include information defining the project area in the Community Profile field in this section. The project area information will include details such as descriptions of the general population, special populations, significant industries, and businesses.

Sally is ready to show you how to enter the Community section of the River City subapplication.

Scroll down to see slideshow captions.

Select the Find Community button on the Community section screen to search for a name to complete the subgrant application.
When you select the Community link on the sidebar menu, the Community section screen appears. From here, select the Find Community button.
To search for information about River City, you can complete either the Community Name or County Name field. You don't need to do both. You also don't need to type the entire name. eGrants can start a search using only a single letter. However, that can produce an undesirably long list of results. Today, just type “Rive” into the Community Name text field.
When completing the Community section, the results of a Find Community search can be sorted by several filters. The example shows Community Name selected. See Appendix for alt text description.
Next, select the Sort By drop-down menu. eGrants can sort the results by six different criteria. Select the "Community Name" option.
A Results per Page drop down menu allows you to view 5, 10, 15, or 20 listings per page of the results of your Find Community search.
Then, select the Results per page drop-down menu. This lets you determine how many search results will appear on each page. Select the “20” option. Finally, select the Search button.
Use the radio button to the left of the desired community name to populate data fields in the Community section of a eGrants subgrant application.
When the list of results appears, you'll want to select the radio button in the Select column on the left side of the community name you desire. We want to select the “River City” option.
The selected community name appears on the Community page.
You see River City's name appear on the Community screen. Now you can scroll down and complete other fields on the screen.
Mitigation Plan Section
The Mitigation Plan section allows the Subapplicant to provide the status of the local, state, or tribal mitigation plans.

If there is a FEMA-approved plan in compliance with 44 CFR Part 201 on file with FEMA, eGrants users can use the Find Plan button to locate the electronic copy of the plan in the Plans Repository and auto-fill the plan information in this section. If the plan is not in the Plan Repository, Subapplicants should enter the name, type, and approval date of the plan. If any other mitigation plan has been adopted, the Subapplicant should provide information by selecting the Add Plan button.

For project subapplications, Subapplicants must describe how the proposed activity relates to or is consistent with the local, state, or tribal plans.

Mitigation Plan Section (continued)
Sally will show you how to begin the Mitigation Plan section for the paper subapplication. You will use the Find Plan button, since River City has indicated that it has a FEMA-approved mitigation plan.

Scroll down to see slideshow captions.

To begin working on the Mitigation Plan section of a subgrant application, select the Incomplete Status link next to the section name on the Application Status screen. See Appendix for alt text description.
From the Application Status page, select the Incomplete link in the Status column on the right of the Mitigation Plan section.
Select a Yes, No, or Not Known radio button to indicate if community is covered by a FMEA approved Multihazard mitigation plan. If answer is Yes, select the Find Plan button. See Appendix for alt text description.
You can select the radio button on the left of the Yes, No, or Not Known options to indicate whether the community that will benefit from the proposed activity is covered by a current FEMA-approved multihazard mitigation plan. River City is covered, so select the Yes radio button. Since the River City plan is on file with FEMA, you can search for it and have the plan information automatically added to the form. To begin your search, select the Find Plan button.
You can use several criteria to search the FEMA Plans Repository including Plan type. The drop down menu displays five options including: Local Multihazard Mitigation Plan (selected).
The Find Plan screen appears. You can search the Plans Repository by entering and sorting by the following criteria: Plan Name, Plan Type, Plan Applicant, Jurisdiction Name, CID Number, Author, and Plan Status. For the River City plan, select the Plan Type drop-down menu. This drop-down menu has five options. You need to select the"Local Multihazard Mitigation Plan." Then, select the Search button.
The Search Results page shows a plan that matched the criteria selected. It is the V3MR7 Local Single Jurisdiction Plan (selected), and the Select Plan button is highlighted and emphasized. See Appendix for alt text description.
Plans that match our search are listed. Select the radio button in the Select column that corresponds with the River City local single jurisdiction plan. Then, select the Select Plan button.
After selecting a plan from the Plans Repository, you must enter a description of how the proposed activity is consistent with the FEMA-approved mitigation plan. See Appendix for alt text description.
You can see that the plan information is automatically populated from the plan you have selected. You now need to enter an explanation of how the proposed activity relates to or is consistent with the FEMA-approved mitigation plan in the description text field.
highlighted Save and continue button
Then, select the Save and Continue button.
Scope of Work Section

The Scope of Work section is for providing more detailed, specific information about the proposed mitigation activity, including a detailed description of the activity, its location, the method proposed to complete the activity, feasibility data, and identification of the contractors and project manager. This level of detail will provide the Applicant, as well as FEMA, with sufficient information to evaluate the proposed activity for effectiveness and eligibility for a subaward.

Note Icon
Note
The information required for the Scope of Work section differs for planning, project, management costs, and technical assistance subapplications.
Complete the Scope of Work Section
Sally would like to show you how to complete the Scope of Work section for the River City Floodplain Acquisition—Phase 1 subapplication.

Scroll down to see slideshow captions.

Select the Add Activity button on the Scope of Work section to list a proposed mitigation activity.
The Scope of Work section has three parts. In the first part, we need to identify the types of mitigation activities proposed in the River City subapplication. From the Identify Hazard(s) to be mitigated drop-down menu, select the "Flood" option. Then, select the Add Activity button.
Select up to 20 mitigation activity names and codes to be  displayed using the Display Options drop-down menu on the Add Activity screen.
We need to choose the activities proposed in the subapplication from the list provided. Select the Display Options drop-down menu to see up to 20 activities at once. Select the "Show 20" option so we can see a wide selection. Then, select the Go button.
Select the checkboxes left of the activities included in the Scope of Work proposed in your subgrant application.
You can add multiple activities at the same time. You just select the checkboxes in the Select column to the left of the activity names and codes. Right now, select the checkbox next to "Activity Code 200.1" for acquisition of property near a riverine flooding area. To see more of the list of activities, select the Next 20 button. Once we have selected the checkboxes for all of the activities we need to identify, select the Add Activity button.
The Scope of Work lists activity title, hazard type, and activity code(s).
The activity that we added now appears on the list on the Scope of Work screen.
highlighted Save and continue button
You can repeat those steps to add more activities or select the Save and Continue button. That will save that information you just added and take you to Parts 2 and 3 of the Scope of Work section.
Properties Section

In a project subapplication, the Properties section allows the Subapplicant to designate the properties to be mitigated for each project activity selected in the Scope of Work section. Before you can add a property to the Properties section, you have to complete the Scope of Work section. Some of the types of activities selected in the Scope of Work will require property information and some will not. You must complete all four pages of the Properties Section to successfully submit your subapplication.

There are four steps to adding a property. First, select the Add Property button for an activity that will impact a property. Second, you will need to enter the property address and information about the owner and co-owner, if applicable. The last two parts of this section collect information about the property such as:

  • Age and type of structure
  • Purchase price
  • Latitude and longitude
  • Membership in National Flood Insurance Program (NFIP) and policy number
  • Identification as a FMA Repetitive Loss property
  • Identification as a FMA Severe Loss property
  • Property Locator number
  • Base Flood and First Floor Flood Elevations (if required)
  • Property action

For FMA subapplications, it is necessary to provide the NFIP identification number for all properties.

Note Icon
Note
The Properties section is only required for project subapplications.
Note Icon
Note
You can also upload or import a list of properties from a spreadsheet that will automatically populate the fields in the Add Property function.
Importing Properties Information
The River City Floodplain Acquisition project involves three properties. River City provided a compact disk containing a spreadsheet with the property data. If you upload it, the information will automatically populate the fields in the Add Property section.

Sally will show you how to import the River City Properties data.

Scroll down to see slideshow captions.

To import an Excel spreadsheet with information on properties to be mitigated, select the Import Properties button on the Properties (Page 1 of 4) screen. See Appendix for alt text description.
You can import Properties from an Excel spreadsheet. From the Properties screen, select the Import Properties button.
Select the Choose File button on the Import Properties screen to open the File Navigator on your computer to locate the Excel file with information on the properties to be mitigated. See Appendix for alt text description.
The Import Properties screen appears. Select the Choose File button to find the location of the Excel file on your computer.
Select the Excel file with information on properties to be mitigated from the list of documents on  your computer and select the Open button. See Appendix for alt text description.
Your computer's file navigator window opens. Select the Excel file you need. Then, select the Open button.
The title of the selected file appears to the right of the Choose File button. Select the Import button to upload the Excel file to the Properties section of your subgrant application. See Appendix for alt text description.
The title of the Excel document appears in the text field to the right of the Choose File button. Select the Import button.
Schedule Section

The Schedule section is where you add detailed information about the length of time and sequence of each proposed activity listed In the Scope of Work section. You must list each task that is required to complete the activity, the expected timeframe, and when it should occur within the overall schedule for the activity. You are also required to provide information about the personnel who will perform each task.

Sally will show you how to add a task to the River City Floodplain Acquisition Project—Phase 1 schedule.

Scroll down to see slideshow captions.


Select the Add Task button on the Schedule screen to add a task to the schedule for a proposed mitigation activity listed on the Scope of Work section of a subapplication. See Appendix for alt text description
To add a task needed to complete the mitigation activity listed in the Scope of Work section of the River City Floodplain Acquisition—Phase 1 subapplication, select the Add Task button on the Schedule screen.
On the Add Task screen, enter a brief description of the task to be accomplished in the Description of Task text field. See Appendix for alt text description.
The Add Task screen appears. In the Description of Task text field you need to enter the name or a brief description of the task. Finalizing the agreements between River City and the State of Columbia is the first task that must be accomplished to begin the acquisition and demolition project. So enter "State-Local agreements" in the Description of Task text field.
In the Starting Point text field on the Add Task screen, enter the start day of the task, then select the unit of time from the drop down menu. Example shows: 1 Month(s). See Appendix for alt text description.
You must set a starting point for the mitigation project schedule. We will measure time for the project in months. In the Starting Point text field, enter "1." Then, using the Unit of Time drop-down menu, select the "Month(s)" option.
To set the duration of the listed task, on the Add Task screen, enter a number in the Duration text field and select a unit of time from the drop-down menu. Example shows: 2 Months. See Appendix for alt text description.
Now it is time to document how long it is estimated to accomplish the task. The project manager estimated that it will take about two months to complete the state-local agreements, so enter "2" in the Duration text field. Then, using the Unit of Time drop-down menu, select the "Month(s)" option.
On the Add Task screen, type the name(s) of the people or companies that will accomplish the task listed in the Who will complete the work? text field. Example shows: CDEM, River City. See Appendix for alt text description.
The Add Task screen asks: "Who will complete the work?" This is where you would enter the titles of individuals or companies responsible for completion of the task. For the State-Local Agreements task, the Columbia Department of Emergency Management and the River City local government will do the work. So, enter "CDEM, River City" in the text field. Then select the Save and Continue button.
The Schedule screen asks to estimate the total duration of the proposed activity. Enter a number and use the Unit of Time drop down menu to set a limit. Example shows: 23 Month(s). See Appendix for alt text description.
The Schedule screen appears. The screen asks to "Estimate the total duration of the proposed activity." If you total up all the time needed to finish all the tasks for the acquisition and demolition project, it comes to 23 months. So enter "23" in the Duration text field and select the "Month(s)" option from the Unit of Time drop-down menu. Then, select the Save button to add another task. When all tasks are entered, you can select the Save and Continue button to move onto the next section of the subapplication.
Cost Estimate Section

The Cost Estimate section provides the detailed line item budget for each proposed activity. If more than one mitigation activity is proposed, then the Cost Estimate is broken out by the activities identified in the Scope of Work section. The cost estimate must be itemized rather than listed as a lump sum. You’ll need to have at least two line items for the section to be considered complete. Personnel and Equipment are two common line item costs listed.

You must click the Add Item button to add each new cost item.

Information required for each cost item includes:

  • Item Name (i.e., general description of the cost)
  • Subgrant Budget Class (selected from a drop-down list)
  • Unit Quantity (e.g., 1,2,3...)
  • Unit Measure (e.g., each, acres, cubic feet, etc.)
  • Unit Cost per item

The cost estimate for each item, as well as the total Cost Estimate for all items, is automatically calculated.

After selecting Cost Estimate from the Sidebar menu, select the Add Item button to add a line item to the project budget. See Appendix for alt text description.
Cost Share Section

The Cost Share section allows the Subapplicant to identify the total amount and sources of the Non-Federal Cost Share for the subaward. For example, the PDM grant program allows a maximum of 75% of the total cost estimate to be met by federal funds, and so a minimum of 25% of the total cost estimate must be met by non-federal funds. You can adjust the Proposed Non-Federal Share dollar amount to reflect the actual non-federal contribution to the subaward.

Sally will show you how to work on the Cost Share section of the River City subapplication.

Scroll down to see slideshow captions

The Cost Share screen displays the funding sources and dollar amounts. The Proposed Non-Federal Share is the amount of money that will come from local government and community funds. The cash and in-kind contributions that River City has earmarked for the Floodplain Acquisition project total $150,870, so enter that amount in the Proposed Non-Federal Share text field. Then, select the Recalculate Share button to determine the percentage of the total cost estimate that is represented by the revised non-federal Share contributions.
The percentage of non-federal funds in relation to the federal funds is adjusted and the funding totals are displayed after the Recalculate Share button is selected.
The recalculated dollar amounts and percentages for both the Proposed Federal Share and Proposed Non-Federal Share are displayed.
Cost Share (continued)

The Cost Share section also allows the Subapplicant to identify all of the sources of the non-federal funds and whether each source will be cash or in-kind services. You may list the funding sources by selecting the Add Cost Share button.

Information required for each cost share includes:

  • Source agency (e.g., state, local, private non-profit, tribal, etc.)
  • Name of source agency
  • Funding type (cash or in-kind)
  • Amount

This section also has an Attach File button to use to attach a funds commitment letter.

Note Icon
Note
If cost share funds are added, then the total amount of cost share funds must equal the proposed non-federal share dollars in order for the Cost Share section to be complete.
Complete the Cost Share Section
Sally will show you how to complete the Cost Share section for River City Floodplain Acquisition—Phase 1 subapplication.

Scroll down to see slideshow captions.

List matching Non-Federal funds sources, whether cash or in-kind services by selecting the Add Cost Share button.
To complete the rest of the Cost Share section, select the Add Cost Share button.
To enter the Non-Federal funding for the River City project, select the Funding Source drop-down menu. This menu has four options. Select the "Local Agency Funding" option to provide details about the funds promised by the River City community.
To identify a matching non-federal funding source, select the Name of Funding Source field and type the source.
Select the Name of Funding Source field and type the name of the source. The bulk of the funds will come from the River City government. So, type “Office of the Mayor” in the Name of Funding Source field.
To identify the type of matching non-federal funds, select the Funding Type drop-down menu.
Select the Funding Type drop-down menu. This menu has nine options. Select "Cash." The total promised by the River City government also includes an in-kind donation of labor. You will add that cost share later.
To identify the amount of matching non-federal funds, select the Amount field and type amount. The example shows “130,870.00” in the Amount field. See Appendix for alt text description.
Select the Amount field. River City will contribute $130,870 to the Floodplain Acquisition project. So type “130,870” in the Amount field.
Select the Date of availability field. The funds will be released in August 2017. So type “08-20-2017" into the Date of availability field.
On the Cost Share screen, add the funds commitment letter date in the (emphasized) 
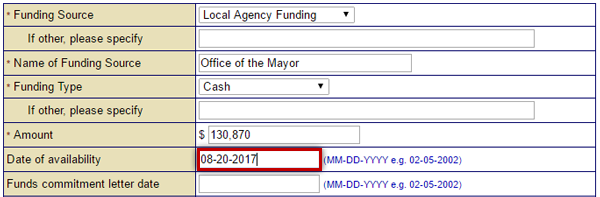
text field (example shows 05-20-2017). Then select the (emphasized) Save button. See Appendix for alt text description.
Next, select the Funds commitment letter date field. The letter from the Mayor's office detailing the budgeted funds is dated May 12, 2017. So enter “05-12-2017” into the Funds commitment letter date field. Then, select the Save button.
On the Cost Share screen, select the Attach File button to attach an electronic file of the funds commitment letter or indicate it is being sent through the mail. See Appendix for alt text description.
Now, select the Attach File button. You will follow the steps to attach an electronic file like I showed you earlier.
On the Cost Share screen, the file name of the attached letter (Acquisition_AttachmentR_FundAuthorizationResolution_Draft.docx) appears. Select the Save and Continue button. See Appendix for alt text description.
The file name now appears on the Cost Share screen. Select the Save and Continue button.
At the end of the Add Cost Share process, the details about the matching non-federal funds appear on the Cost Share page.
You can see that the Cost Share you added is now listed on the Cost Share screen.
Cost Effectiveness Section
The Cost Effectiveness section collects information about the cost effectiveness of the proposed mitigation activity. The information to be provided here is based on a FEMA-approved Benefit-Cost Analysis (BCA). The Benefit-Cost Ratio (BCR) is calculated by dividing the Net Present Value of the Project Benefits by the Total Projected Cost Estimate for the project. Select the Attach button to upload BCA documentation.

Maintenance costs are included in the BCA, so it is important to use the Total Project Costs figures generated through that analysis when completing this section.

This section is not required for planning subapplications.
Select the Attach button the Cost Effectiveness screen to attach the Benefit Cost Analysis (BCA) for the project. List the Net Present Value of Project Benefits and the Total Project Cost Estimate below. See Appendix for alt text description.
Evaluation Section

The Evaluation section is used for entering detailed information on projects and plans in the PDM grant program's National Review Process. Subapplicants are not required to complete all of the questions in this section; however, the Applicant must complete the section in order to approve the PDM subapplication (Refer to Lesson 11 for more information). This section is not included in management costs subapplications.

Specific details that need to be collected include:

  • Community participation in programs such as the Community Rating System and Firewise Communities
  • Desired outcomes, methodologies, performance expectations, timelines, milestones, and staff and resource plans
  • Partners' involvement, long-term financial and social benefits, and outreach activities
  • Percentage of population benefiting, as well as the cost-effectiveness (BCA) of projects

Note Icon
Note
FMA Subapplicants may select the "Not Applicable" box in the Evaluation section.
Screenshot of the Evaluation section. Required for Pre-disaster Mitigation subgrant applications. See Appendix for alt text description.
Environmental/Historic Preservation Review Section

The Environmental/Historic Preservation Review section is required for project subapplications only. The EHP Review section does not appear on planning, management costs, or technical assistance subapplications.

The EHP Review section is broken down into 11 parts covering relevant environmental laws and executive orders. Responses to each of these sections allow FEMA Reviewers to identify any potential environmental impacts that may result from the mitigation activity and to identify remedies to eliminate or lessen any adverse impact.

To complete this section, you can either move through Sections A–K sequentially using the Save and Continue button, or use the drop-down menu to navigate to any of the sections.

Screenshot of eGrants Environmental/Historic Preservation Review screen. There are 11 questionnaires related to environmental and historic preservation laws and executive orders. See Appendix for alt text description.
Assurances and Certifications Section

This section of the subapplication will appear only if Assurances and Certifications is enabled by the Applicant in the administration preferences. The Assurances and Certifications section is intended to provide documents listing federal requirements for FEMA grants. There are three documents that may appear in this section. The first form listed in this section as Part I differs based on whether or not construction is proposed in the subapplication.

Part I: FEMA Form (FF) 20-16A, Assurances Non-Construction Programs: This document asks Subapplicants to certify that they will comply with a series of requirements including non-discrimination, environmental standards, and audits. If the subapplication circumstances do not include a Non-Construction program, select “Not Applicable” for this form.

or

Part I: FEMA Form (FF) 20-16B, Assurances Construction Programs: This document asks Subapplicants to certify that they will comply with a series of requirements including non-discrimination, environmental standards, and audits. If the subapplication circumstances do not include a Construction program, select “Not Applicable” for this form.

Part II: FEMA Form (FF) 20-16C, Certifications Regarding Lobbying; Debarment, Suspension and Other Responsibilities Matters; and Drug-Free Workplace Requirements: This document asks Subapplicants to certify regarding lobbying, debarment, suspension, and other responsibility matters as well as drug-free workplace requirements.

Part III: SF-LLL, Disclosure of Lobbying Activities: This document asks Subapplicants to disclose their lobbying activities. Complete this only if you are applying for a subaward of more than $100,000 and have lobbying activities using non-federal funds. If those circumstances do not apply, select “Not Applicable” for this form.

Assurances and Certifications section may be required by the Grant Applicant.
Comments and Attachments Section

Many sections of the subapplication form have a Comments text field and an Attachments button. To facilitate the review of the subapplication by the Applicant and FEMA reviewers, it is best to add comments and attachments directly to the section they concern.

  • Comments are text only and may provide additional information.
  • Attachments may be any file type (e.g., Word documents, Excel spreadsheets, PDF files, etc.) up to 50 MB in size. For larger files or paper documents, a Subapplicant may indicate to the Applicant that additional documentation will be sent by mail. Whenever possible, Applicants should create electronic files by scanning these mailed documents and then attaching the electronic files to the subapplication. The attachment file name should clearly reflect the contents of the attachment.

The Comments and Attachments section consolidates all the comments and attachments in a subapplication for easy review. It also provides the Subapplicant with an opportunity to provide information not covered by the subapplication sections. This may include any information that could potentially help the Applicant or FEMA come to a decision regarding the subapplication or provide documentation to support information provided in the subapplication.

Completing the Comments and Attachments Section
Sally is ready to show you how to complete the Comments and Attachments section for of the River City Floodplain Acquisition subapplication.

Scroll down to see slideshow captions.

To attach an electronic file or paper document to your eGrants application, select the Add button on the Comments and Attachments screen.
We are going to need to attach some supporting documents to the subapplication. While it is best to attach a document directly to the section to which it pertains, you can also do it in the Comments and Attachments section of the subapplication. Once you are on the Comments and Attachments screen, you'll begin the process by selecting the Add button.
To identify which section of the application to which you wish to attach the document, select the Name of Section drop-down menu.
From the Name of Section drop-down menu, select the section of the subapplication to which you want to attach the document. The menu has seven options. We have a Word document we want to attach to the Scope of Work section, so select the "Scope of Work" option.
To provide comments regarding the attachment to your eGrants subgrant application, select the Comments field and type a brief description.
You need to provide a short explanation about the document you are attaching. The document we want to attach explains the rationale for the project. In the comments text field, type “Rationale and Plan for Acquisition Project.” Then, select the Attachments button. You can attach the document as an electronic file or send it as a paper document through the mail. I will show you how to do both processes in eGrants.
Electronic Files

Within the Comments and Attachments section, Subapplicants are provided with the opportunity to attach various files that provide additional information to the Applicant and FEMA. These files may be either paper or electronic.

Sally will show how you how to attach an electronic file in the Comments and Attachments section of the River City Floodplain Acquisition—Phase 1 subapplication.

Scroll down to see slideshow captions.

To upload an electronic file from your computer as an attachment to your subgrant application, select the Electronic File radio button from the Attach Document screen.
After you have selected the Attach File button, you will see the Attach Document screen appear. You will need to upload the Word document to be able to attach it to the Scope of Work section of the subapplication. Select the Electronic File radio button to upload the file to the subapplication.
To attach an electronic file to a subgrant application you must identify operating system.
It is necessary to identify the computer operating system that was used to create the file. To do that, select the Operating System drop-down menu. This menu has four options: Windows, Macintosh, Unix, and Other. We are going to upload a Word file and Word is a Microsoft ® product, so select the "Windows" option.
To attach an electronic file to your subgrant application, you must identify the software used to create the file.
We also need to identify the format of the file being attached. Select the File Format drop-down menu. This menu has 12 options. Since we want to upload a Word document, select the "MS Word" option.
To attach an electronic file to a subgrant application, you must indicate if the file is compressed. Select the Compression Format drop-down menu. There are four options—None, Zip, Win RAR, and Other. See Appendix for alt text description.
Sometimes large files are compressed (or zipped) to make it easier to upload and download them. You need to indicate if you have compressed the file you wish to upload. Select the Compression Format drop-down menu. This menu has four options: None, Zip, Win RAR, and Other. The Word document we want to attach doesn't have a very large file size, so we won't need to compress it in order to upload it. So, select the "None" option.
To locate the electronic file you wish to upload as an attachment to your subgrant application, select the Choose File button on the Attach Document screen.
To find the file you want to upload, select the Choose File button.
Locate and select the electronic file you wish to attach to your subgrant application from list of files on your computer.
This opens the file explorer on your computer so you can navigate to and select the file you want to attach. Select the document titled “Rationale and Plan for Acquisition Project,” and select the Open button.
highlighted Save and continue button
Then, select the Save and Continue button.
As a confirmation that the electronic file has uploaded, an abbreviated version of name of the file will appear to the right of the Choose File button on the Attach Document screen.
You will see an abbreviated version of the file name appear to the right of the Choose File button. That serves as a confirmation that the document uploaded successfully. Select the Save and Continue button to move onto the next section.
Paper Files

In many cases, documents to be attached within the Comments and Attachments section of a subapplication may exist only as a hard copy or in a paper form. In that case, the Subapplicant must mail the documents to the Applicant, and the Applicant will scan them when possible and attach them electronically to the subapplication. When it is not possible to scan the mailed documents, the Applicant will forward the paper copies onto FEMA. It is important that information about the mailing of documents is entered into the eGrants system. This ensures that a complete application file is created with reference to any non-electronic information.

Sally wants to show you how to reference a supporting paper document being sent through the mail.

Scroll down to see slideshow captions

To indicate that you are sending a document via the U.S. Postal system, select the Regular Mail radio button to the right of the Select Option label.
If we can't scan the document to create an electronic file or the electronic file is too large to upload, it still can be included as supporting evidence in the subapplication. We just need to send it to FEMA in the mail. To indicate that you are sending a document via the U.S. Postal system, select the Regular Mail radio button to the right of the Select Option prompt on the Attach Document screen.
You need to record when you sent a document through Regular Mail, to do so select the Mail Date field and enter the date.
To create a record of the transaction, you'll need to enter the date when the document was mailed to FEMA. I put the document in the mail this morning. So, type “05-21-2017” into the Mail Date text field.
To document the item being sent via Regular Mail, select the Mail Description field and type a brief description.
Like with the electronic file, you need to type a brief description of the item being sent. Type “Rationale and Plan for Acquisition Project” in the Mail Description text field. Then, select the Save and Continue button.
The Documents Mailed screen displays the details about the items sent via Regular Mail including the mail date and a description of the item.
The Document(s) Mailed screen appears and displays the mail date and the description of the item being sent via Regular Mail.
Lesson 7 Summary

You have finished the lesson on completing subapplications. In this lesson you learned that:

  • Information regarding the Subapplicant, the community impacted, and affected properties are captured in the Subapplicant, Contact Information, Community, and Properties sections. The Properties section is only required for project subapplications.
  • The hazard mitigation activities that are planned, the proposed schedule, details about the estimated costs, funding sources, and the analysis of the benefits of the activities vs. the costs are documented in the Mitigation Activity Information, Scope of Work, Schedule, Cost Estimate, Cost Share, and Cost Effectiveness sections. The Cost Effectiveness section is required for project subapplications only. The Cost Share section is not required for planning subapplications.
  • Agreements to adhere to a variety of federal employment, environmental, historic preservation, and other laws and FEMA regulations are documented in the Environmental/Historical Preservation Review and Assurances and Certifications sections. The EHP Review section is required for project subapplications only. An Applicant may or may not require a Subapplicant to complete the Assurances and Certifications section.
  • If a planning or project subapplication is being submitted under the PDM grant program, the Evaluation section must be completed so that the subapplication can be assigned a priority status.
  • It is preferable that Applicants use the Comments text field and an Attachments button in subapplication and application sections for uploading document files. However, additional information can be added to an application or subapplication by using the Comments and Attachments section. eGrants users can also indicate that they are sending additional documentation by mail. Applicants should scan these mailed documents when possible and attach them electronically to the subapplication or forward the mailed documents onto FEMA.